Experiencia Mistica program

arduino, processing, projects, tutorial

No Comments


Share this post

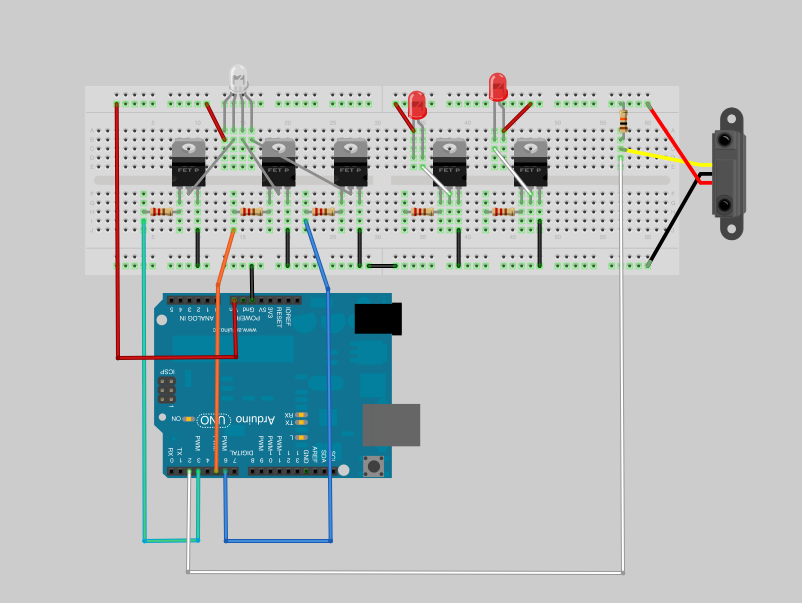
In an effort to document and archive the circuit and program of the experiencia mistica installation, I publish this circuit and code, in wich a PIR (infrared motion sensor) triggers a display of a RGB LED strip and 2 strobe lights. Additionally has a 12V input and a webcam. It runs in processing with different libraries, such as Arduino, processing.video and minim for the audio


import processing.serial.*;
import cc.arduino.*;
import ddf.minim.*;
import processing.video.*;
import gifAnimation.*;
Minim minim;
AudioPlayer player;
Arduino arduino; //creates arduino object
Capture cam;
Gif tunel;

//variables for PIR
int PIRPIN = 2;
int ledPin = 13;
int counter;

//Variables for RGB strip
int REDPIN= 5;
int GREENPIN= 3;
int BLUEPIN= 6;
int r, g, b;

//Variables for R L strobes
int LEFTPIN =9;
int RIGHTPIN=10;

float leftChannel;
float rightChannel;
float soundValLeft;
float soundValRight;

void setup(){
size(800, 600);
colorMode(HSB);
tunel = new Gif(this, "tunel.gif");
tunel.loop();
cam = new Capture(this, 160, 120);
arduino = new Arduino(this, Arduino.list()[0], 57600);
arduino.pinMode(PIRPIN, Arduino.INPUT);
arduino.pinMode(ledPin, Arduino.OUTPUT);
arduino.pinMode(REDPIN, Arduino.OUTPUT);
arduino.pinMode(GREENPIN, Arduino.OUTPUT);
arduino.pinMode(BLUEPIN, Arduino.OUTPUT);
arduino.pinMode(LEFTPIN, Arduino.OUTPUT);
arduino.pinMode(RIGHTPIN, Arduino.OUTPUT);

minim = new Minim(this);
player = minim.loadFile("mystica2.aiff", 1024); //or 2048
player.play();

}

void draw(){
int pirVal = arduino.digitalRead(PIRPIN);

if(pirVal == Arduino.LOW){ //was motion detected
counter ++;
if (counter == 5){ // the sensor has to be triggered at least 5 times to detect strong motion
arduino.digitalWrite(ledPin, Arduino.HIGH);// send the siignal
player.play();
background (255, 0, 0);
//delay(2000);
}

}

if(pirVal == Arduino.HIGH){ //was motion detected

counter=0;
arduino.digitalWrite(ledPin,Arduino.LOW );
background (0, 0, 0);

}

if ( !player.isPlaying() ){
player.rewind();

}
if ( player.isPlaying() ){
for(int i = 0; i < player.bufferSize() - 1; i++) {
soundValLeft= player.left.get(i)*150;
soundValRight= player.right.get(i)*100;

}

int soundintL = int(soundValLeft); // int version of sound value
int soundintR = int(soundValRight);

arduino.analogWrite(LEFTPIN,soundintL);
arduino.analogWrite(RIGHTPIN,soundintR);
cam.read();
image(tunel,0,0);
image(cam, 322, 236);

if (g==255){ // loop for green variation
g=0;}else g++;

tint (g, 255, 255);

if (r==200){ // loop for red variation
r=0;}else r++;

arduino.analogWrite(GREENPIN,g);

arduino.analogWrite(REDPIN,r);

arduino.analogWrite(BLUEPIN,soundintR);

}

}

Read more

PIR sensor code

arduino, tutorial

No Comments


Share this post

After reading a little bit about motion sensing with PIR sensors and arduino, I was able to improve this code a little bit. The idea came up from sensing “strong motion” as opposed to just a random one.

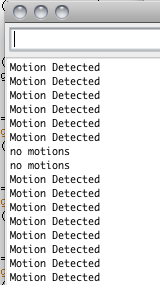
This image shows a previous code based on the buildr link above:

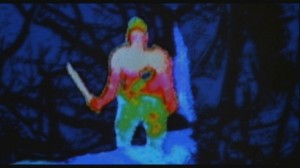
The idea is that it will only turn the led on or send a “motion detected” message if a strong motion is detected, that is if 5 consecutive signals from the infraRed sensor will trigger the actual action. I was trying to debug this sensor trying to understand its behavior correctly. When I built the circuit, I noticed the motion sensing was as not as reliable as I wanted. That was triggering a false or unwanted signal. Based on my observations of how my interactions with the sensor affected the LED and serial messages, I discovered that the sensor sometimes will send a weird “LOW” to the board and trigger the alarm… But what is the probability of 5 signals in a row? That is what this program does… It is very reliable now!  It was just a software solution to the sensor debugging.  In fact the “motion” sensor is actually activated by heat sensing, a variable associated with motion…. Watch out predator, I can sense you now!

int pirPin = 2; //digital 2
int ledPin = 13;
int counter;

void setup(){

pinMode(pirPin, INPUT);pinMode(ledPin, OUTPUT);
}

void loop(){
int pirVal = digitalRead(pirPin);

if(pirVal == LOW){ //was motion detected
counter ++;
if (counter == 5){ // the sensor has to be triggered at least 5 times to detect strong motion
digitalWrite(ledPin,HIGH);// send the signal put your trigger action here

}

}

if(pirVal == HIGH){ //was motion detected

counter=0;
digitalWrite(ledPin,LOW );
}

}

Read more

Read values from a 203CE accelerometer directly in Processing

arduino, processing, tutorial, visualization

No Comments


Share this post

1. Upload the “standardFirmata” example from the Arduino IDE in your Arduino board. If you are using Arduino UNO, there is a standard firmata for UNO.

2.Install Arduino library for processing in your libraries folder in the processing sketchbook

3.Test the following code for the Led blink to test that Arduino and processing are communicating correctly (code from the arduino playground page):

import processing.serial.*;
import cc.arduino.*;

Arduino arduino;
int ledPin = 13;

void setup()
{
//println(Arduino.list());
arduino = new Arduino(this, Arduino.list()[0], 57600);
arduino.pinMode(ledPin, Arduino.OUTPUT);
}

void draw()
{
arduino.digitalWrite(ledPin, Arduino.HIGH);
delay(1000);
arduino.digitalWrite(ledPin, Arduino.LOW);
delay(1000);      }

DEBUG.Try the analog read program in the arduino and use the serial monitor to see the maximum and minumum values of the accelerometer. You can take my word that they will be from 300 to 700. Supposedly should be (0-1023) in analog read with mid values around (500).

4. If the LED in the Arduino blinks it means that your “hello world” between the Arduino firmata and processing is working.

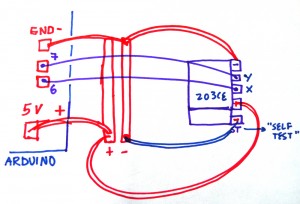
5.Build the circuit: (Connect to A0 for Y and A1 for X) in diagram it says 6 and 7, but it should be an analog pin.

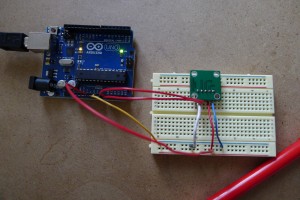
This is the schematic in paper and the photo here:

6. Use the following code in processing:

import processing.serial.*;
import cc.arduino.*;
Arduino arduino; //creates arduino object
color back = color(64, 218, 255); //variables for the 2 colors
int xpin= 0;
int ypin= 1;
float value=0;
PImage a;
void setup() {
size(800, 600);
arduino = new Arduino(this, Arduino.list()[0], 57600); //sets up arduino
a = loadImage("mar.png");
arduino.pinMode(xpin, Arduino.INPUT);//setup pins to be input (A0 =0?)
arduino.pinMode(ypin, Arduino.INPUT);
}
void draw() {
background(back);
noStroke();
image(a,arduino.analogRead(xpin)-180, arduino.analogRead(ypin)-300); // in case you want to draw an image
//ellipse(arduino.analogRead(xpin)-130, arduino.analogRead(ypin)-130,30, 30); // in case you want an ellipse
}

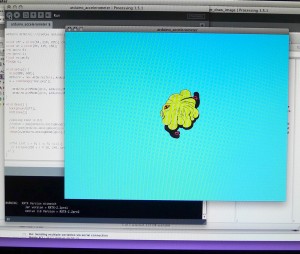
–This program tracks down the X and Y values from the accelerometer and displays them altering the position of a graphic in the screen.

–You’ll need to replace the image mar.png in the data folder.

–The position of the object needs to be calibrated to the min and max values the accelerometer is giving you through the serial monitor and for this reason I substract 180 and 330 to the position of the graphic. It still needs improvement!

Read more

Sprite Art Workshop at the College for Creative Stidies in Detroit

news, thoughts, tutorial, workshop

No Comments


Share this post

During the past month there have been a lot of ‘bloggable’ events in my life that I haven’t been able to document because of the lack of time. What can I say, new Zine, new shirts, and travel plans! It is a very exciting moment in my life that coincides with the coming of spring and my 30th Birthday. One of the projects that had me excited all semester was the Sprite Art Workshop at the CCS, Detroit. I was invited by my artist friend Brian Barr whom we went to school together at Purdue’s Fine arts grad program. We hadn’t seen each other for about 4 years, but he contacted me through FB to see if I was interested to do a lecture and workshop with his painting students from the CCS. I immediately replied because I love doing workshops, it is my favorite art activity. It’s really fun to teach something for a day and to interact and collaborate with the participants. The outline of the lecture presentation can be downloaded here:
/sprite-art/
Here is a picture of Brian:

Stefi drove me there from Lafayette, and it was a long 6 hour trip with a stop in Mc Donald’s. I use to like these Mc Donald’s stops a lot, but since we saw that movie Food Inc., it really ruined it for me. I hate doing statements about meat and stuff like that, but the reality is that it is just fucking gross. Yes the food industry is ripping everybody off and there is nothing we can do about it. My favorite stop ever was on a KFC/Tacobell restaurant, you could order nuggets and burritos on the same place! I asked if I could have KFC crunchy chicken on my chalupa but that was not possible. Anyways those rest stops are over and I’m sure I will miss the MSG craving every now and then. Okay going back to the Detroit story…
We got up early in the morning to go to the workshop. Some students got there fashionably late and heard me talk about digital art for about 1 hour. After that we started sketching some characters and then we went to the computer lab. We used photo cameras to scan the drawings, it was easy and worked well. At the end of the workshop, we had a few functional animations and a lot of creative sprites.
Walking around the College for Creative Arts was awesome, the environment felt very artistic and creative. They had an amazing art library with Magazines I even didn’t know they existed. I have always wondered if state Universities with their tenure track positions are positive to the arts, and CCS shows a different model to this. The teaching jobs there are contract based and have to be renewed regularly. The focus is on education as oposed to research, which makes more sense to me. There is a lot of hostility to get to be a tenure professor. A lot of really nice assistant professors that I’ve liked have been bullied-out of the schools I’ve been to, and it’s heartbreaking and sometimes very unfair.
Detroit has also a growing young artists’ scene that has taken advantage of the real state/financial crisis to take over the city. There are lots of artist-run gallery spaces, and old factories now turned art studios. We visited Brian’s and Lauren’s studio at an old Car/plane manufacturing plant. Here are some pictures:

Lauren and Brian showed us around and they are great hosts. We ate delicious food, had lots of funny conversations and enjoyed sharing experiences. It was so nice to spend time with friends! We went to a show in a space called Butter Projects that was very nice. I had a positive impression of the place when I saw a pregnant young woman giving chilled PBR’s from a tub. The show was called ‘nude’ and featured about 10 artists I think. The quality of the work was a little strange, it seemed that the work in it had been created the night before and carelessly. I really appreciated the sense of community from this opening, and it reminded me of the lively Lationoamerican art scenes like in Bogotá, Mexico DF or Caracas. With a similar cast of participants, the show was more about the gathering of people, but not a lot about the art and the ideas. I wish I would have talked to the guy that did the croched pink costume. That was great work!
I hope that the Detroit kids learn to capitalize the uniqueness of their city to produce significant work. The setting is ideal for a renewal of the american art, with the potential of becoming an art center like LA or NY. The future is now for them and it is in the hand of the current Detroit artists to lead attention to the art critics. Or maybe not? maybe trying to imitate the big-art-center scheme would be stupid? Didn’t the scheme of ‘making it’ already fail?
Thank you Brian, Lauren and Stephanie for such great trip experience.

Read more

Banana DOOM – Videogame mod project

projects, tutorial

No Comments


Share this post

During the past year I’ve been programming my own videogames using the tool called Unity. It is a free engine, and very compatible with the opensource 3d modeling tool wings. I never had used 3D before and it was easy to just start working on it after a workshop organized by ETB and the envision center at Purdue. Besides that, I have been using other game engines for 2D “modding”. Modding means making modifications or ‘mods’ of preexisting games changing the original assets of the game. An example of this is the M.U.G.E.N software that contains the program of a 2-player fight game similar to Mortal Kombat and Street Fighter II. I experienced modding it with an engine called Fighter Factory ultimate. I obviously had to get a machine with windows XP (service pack 3) in it. Anyhow it’s a lot of fun to remove the original graphics and replace them with my own drawings. One example of modding in FFU and M.U.G.E.N. is my Cortez character:

My next modding project consists of moding the historic first-person shooter DOOM. For this I am using a .Wad file called freedoom, a free version of the doom software. A WAD is the extension file of the game files. WAD stands for “Where is All the Data” and it is part of the doom software. You can edit this files using doombuilder and Xtendable WAD editor… both PC shareware/freeware.

I like to use preexisting game plots to raise awareness of historic events. In the case of my Doom WAD, I am creating BANANA DOOM, a game that retells the “masacre de las bananeras” or Banana Massacre in Colombia (1928). You are one of the soldiers that were order to kill 1000+ unionized farmers and their families. The unionized workers pressured the american corporation “United Fruit Company” to get better job conditions. The goverment officials threatened workers to kill them if they didn’t resume their banana collection. A threat that became true and has become one of the landmarks in the history of violence in Colombia.

Here is a video of my WAD replacing the tree sprites with Banana plants:

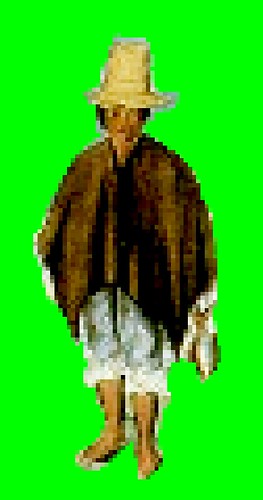
And one of the sprite ideas for the farmer character will be coming soon. It looks like this:

I am using archival images to make the sprite art. But one of my friends will be the Farmer actor.

Read more

Sprite Art Workshop

tutorial, workshop

No Comments


Share this post

The craft of creating animated frames for 2D videogames is refered to as spriting or pixel art. With the advent of new image techniques and technologies in computer graphics, pixel-level editing has become an unusual practice. Hardware’s limiting constraints in resolution and colorspace, shaped early videogame aesthetics. Art director from Megaman for NES, Keiji Infaune explains that there were “severe visual restrictions” and that, a lot of detail couldn’t be added in the dot matrix of early videogame consoles. (Infaune, 2009).

Artists of the digital age explore technologies as new tool for creative development. This workshop will contextualize videogames in contemporary art and will introduce participants to some of the techniques for sprite making and further development.
By: Esteban García
MFA, PhD student in computer graphics, Purdue University.
http://snebtor.chiguiro.org/

Duration: 9 AM – 3:30 PM

Read more